Here is a recipe for all my vegan friends and family from http://www.loveandlemons.com. This gluten-free, vegan pesto recipe is just as good as traditional pesto, even without the cheese! It’s delicious on pasta, pizza, crusty bread, and more.
Ingredients
1/2 cup toasted pine nuts or pepitas
2 tablespoons lemon juice
1 small garlic clove
1/4 teaspoon sea salt
Freshly ground black pepper
2 cups basil leaves
1/4 cup extra-virgin olive oil, more for a smoother pesto
Optional: nutritional yeast, capers, or oil-packed sun dried tomatoes
Instructions
In a food processor, combine the pine nuts, lemon juice, garlic, salt, pepper, and pulse until well chopped.
Add the basil and pulse until combined.
With the food processor running, drizzle in the olive oil and pulse until combined.
For extra cheesy flavor, add 1 tablespoon nutritional yeast. For brinier flavor, add 2 teaspoons capers. For more umami, add 2 oil-packed sun-dried tomatoes. Briefly pulse to combine. Taste and adjust, adding more nutritional yeast, capers, or sun-dried tomatoes, as desired. For a smoother pesto, add more olive oil.
Notes
Store any leftover pesto in an airtight container in the fridge for up to 2 days. For longer storage, freeze the pesto in ice cube trays. Then, transfer the pesto cubes to an airtight container or freezer bag and freeze for up to 2 months.
Knowing how quickly certain foods will go bad and how to store them will help you make a plan for your produce purchases, and, best of all, save you money. Let this produce guide help.
If your spinach goes brown and gooey overnight, you won’t get the chance to eat it. And if your peaches are underripe, you may forget them in your fruit bowl while you’re waiting, only to discover a mushy mess days later.
So to keep you from a sticky situation — and maximize your grocery budget — we created this list of what to look for in 12 fruits and vegetables to ensure peak ripeness (or a little bit of time to wait) so you’ll actually save money on groceries.
Apples
Chris Zuppa/The Penny Hoarder
Although it’s pretty obvious when an apple’s bad, some of the key markers of ripeness (and overripeness) apply across a variety of fruits, so keep that in mind when you’re at the grocery store.
You’re looking for a firm apple that fully displays the color appropriate for its variety and feels heavy for its size — the heavier, the juicier and riper the flesh.
It’s also helpful to look for an intact stem end: It helps a fruit stay healthy and keeps it from drying out.
On the other hand, you’ll want to avoid obvious bruises, soft spots and blemishes, which can quickly turn a good piece of fruit to rot.
The best thing about apples? Once you do find a ripe one, just stick it in the fridge — it’ll last way longer than you think. It could be up to six months before it starts to turn rubbery, and even then, you could probably use it in applesauce or pie filling.
Avocados
There’s nothing worse than looking forward to a delicious, creamy avocado — only to be greeted by a mess of brown mush once you cut into it.
Fortunately, there’s a super-easy way to figure out if avocados are ripe or not: Flick off the little stem bud. If the circle underneath is bright green, your avocado is ripe or close to it. If it’s brown, steer clear — that one’s already turned.
Another secret: If you buy rock-hard, unripe avocados, they’ll ripen in a few days if you leave them on the counter, and even quicker if you put them in a brown paper bag.
Once they’re right where you want them — tender but not too soft to the touch and just turning from dark green to brown — stick ‘em in the fridge to keep them from ripening any further.
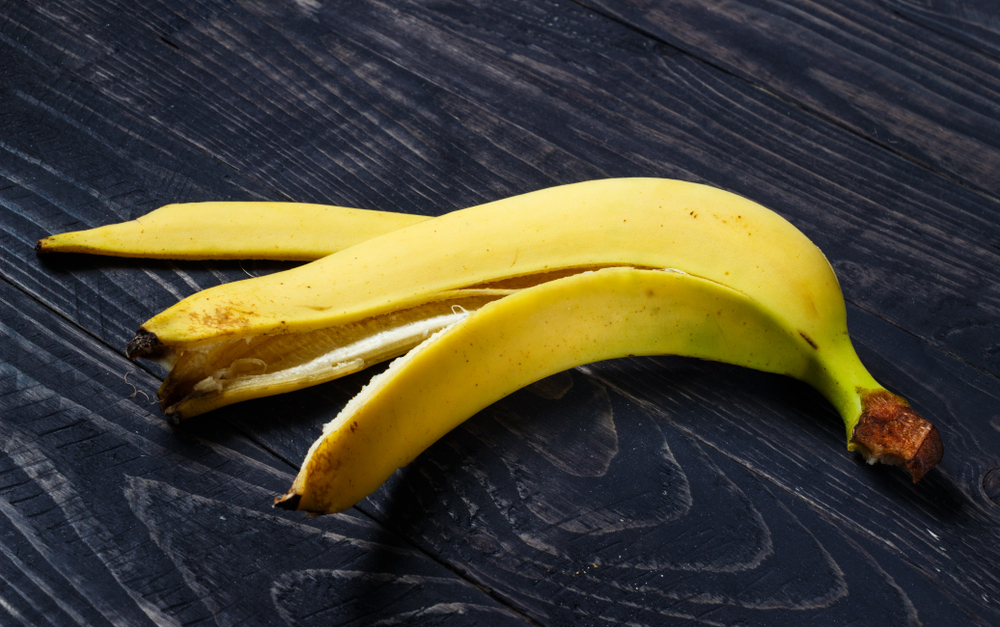
Bananas have something like a stoplight system, except green means “Stop (I’m not ready yet)!”
Yellow is green in this analogy, since it means go…
Which means maybe this is not an appropriate metaphor for bananas.
Anyway.
You probably know yellow bananas are awesome, green ones are firm and less sweet and brown ones fall somewhere on the mush spectrum from “edible, but kind of like baby food” to “totally rotten.”
But if you purchase your bananas early, you can let them develop to exactly where you like ‘em. And at the first sign of brown spots, just throw them in the freezer — they make a perfect base for smoothies.
How many times have you taken home a package of fresh berries just to have it turn into a petri dish of mold in a day or two?
Unfortunately, berries naturally don’t last long — although it’s not hard to scarf them down by the handful, especially during these summer months.
But if you want to select the best contenders, make sure the berries and their packaging are dry. Moisture speeds the growth of mold.
Psst — do yourself one better by running those babies through a vinegar bath!
I know it sounds nuts, but if you rinse them well, they won’t taste like vinegar. This tactic will kill the spores that grow so quickly into mold, giving you more time to enjoy your natural candy.
Broccoli
Fresh broccoli is green. As it matures, it turns yellow… but not always because it’s rotting.
The green clusters on the crown of the broccoli we eat are actually flowers, and when they open they’re — you guessed it — yellow!
As a Florida girl, I know all citrus starts out green — I’ve seen enough of it on the tree.
The best indicator for a ripe piece of citrus fruit is that it’s fully developed its color. If your orange still has green spots, you’re in trouble: Unlike other fruits, citrus doesn’t continue to ripen once it’s been plucked from the tree, so you’ve got to get it right the first time.
You’ll also want to make sure the skin is as smooth as can be expected of these dimpled fruits — if it’s withered or wrinkled, the fruit is past its prime.
Hardness usually means underripe citrus, although I’ve seen fruits get small and rock-hard (instead of soft and oozing mold) after sitting out too long. Eat them at the top of the bell curve, when they’re plump and slightly pliable, but still firm to the touch.
Corn
If you buy pre-packaged corn cobs that have already been shucked, you’ll have a pretty good picture of how good it is: Just make sure it’s got as many of its kernels as possible, is firm but not rock-solid and that nothing looks rotten.
Husked corn is fresher and yummier — but also more difficult to check.
Luckily, there are ways around this without standing in the produce aisle shucking a bunch of corn. Not only would it not be fun, but you might get funny looks… and you’d be sure to bum out whoever’s on the other end of that “Cleanup on aisle five!” announcement.In the U.S., we throw away an estimated 30% to 40% of our food, according to USDA research.
If your corn is still in the husk, check out the husk itself. It should be green, and wrapped tightly to kernels that still feel firm and plump beneath. The tassels at the top should be brown and sticky to the touch.
If the husk has gone brown or the tassels are dry and black, you’re looking at an old ear of corn, so skip it.
Lettuce and Other Leafy Greens
Getty Images
If you’re lazy like me and buy pre-packaged lettuce, you have the benefit of an expiration date — but I’ve watched leaves go brown and slimy way before their time, even while hermetically sealed.
Lettuce of any variety should be turgid, green and dry, without conspicuous brown spots. Give a head of iceberg a squeeze — it should feel firm and juicy, and its outer leaves shouldn’t be sloughing off.
Most leafy greens have a pretty short shelf life (a week, tops). So get to eating those greens! After all, they’re good for you.
Melons
Melons are the most confusing fruit ever. All their goodness is trapped inside their great big shell, unavailable to assess for ripeness.
What to do about it? Make like a detective and rely on the clues you can access.
If you’ve ever seen anyone knocking on a melon, you may be wondering what exactly they expect to hear. Me, too.
And though melon-knockers may seem decisive, and their touch full of finesse, the metrics for a “ripe-sounding” melon are pretty vague: The New York Times suggests you “listen for a melon that sounds full and more like a tenor than a bass.”
Since I wasn’t in my high school band, I think I’ll try a different way for selecting produce.
With watermelon, specifically, you have a major advantage: Water is heavy. So if you pick up one up, it should weigh quite a bit in proportion to its size if it’s ripe and full of water.
While you’ve got it lifted, give it a turn and check its “field spot” — the discolored portion where the melon sat on the ground before it was harvested.
According to the watermelon experts (yes, they exist — see for yourself), this spot should be a “creamy yellow.” If it’s white or greenish, the melon might not be quite ready to eat, but it’ll be great if you’re shopping ahead of time for this weekend’s barbecue!
Honeydew and cantaloupe are a little less mysterious since their rinds aren’t so thick. Like all other fruit, they should be as symmetrical and bruise-free as possible.
Give ‘em a whiff and a squeeze, too: When they’re fully ripe, both of these melons will smell sweet, even through their skin, and they’ll give just a little bit under your fingers.
If you want your melons to hang around for a bit before you eat them, consider going for a scent-free, rock-hard specimen. Just don’t wait too long!
Although firmness is a good indicator for selecting a peach, if it’s too firm, it’s going to taste like nothing at all.
And odds are, this is how you’ll find them at the grocery store, since shipping can be a rough process and ripe peaches bruise easily.
As with other fruits that produce ethylene gas while they mature (like avocados, apples and tomatoes), you can hasten ripening by placing a peach in a brown paper bag on your counter at room temperature.
Peaches are ripe once they smell sweet and are slightly soft to the touch. They’re also more yellow than red — that color is more indicative of sun exposure than ripeness!
Pineapples
Aileen Perilla/The Penny Hoarder
It might seem like a prickly mess to figure out whether a pineapple is ripe. Just looking at one, you may wonder what brave soul first decided we should try to eat these.
Smelling the underside of the pineapple is a good place to start: If the fruit is ripe, it’ll smell sweet, but it’ll be less detectable behind the hard, spiky skin around its sides.
A perfectly ripe pineapple will also give ever-so-slightly when firmly squeezed. Pick a hard one at the grocery store so you can keep it as a sign of welcome on your counter for a few days.
Squash
Squash is to vegetables what melon is to fruit: encased in a big, hard shell and pretty hard (literally) to crack.
Your best bet is to squeeze gently and check for good weight. The skin should be matte, not shiny, and free of obvious blemishes.
One good shortcut? Buy it in late summer and early fall — when you know it’s in
Having friends over and need a quick appetizer that will go perfect with some cocktails:
Ingredients
8 ounces Gorgonzola cheese, at room temperature
2 ripe large Comice pears, cored and sliced
6 ounces prosciutto, sliced paper thin
Directions
Choose a beautiful cheese board for serving. Cut a chunk of the Gorgonzola, place on a slice of pear and wrap in prosciutto. Repeat with the remaining Gorgonzola, pear and prosciutto.
It’s Pizza Friday so here is another recipe to try out, I love trying different ingredients for the adults because the kids won’t try it:
Ingredients
Dough:
One .25-ounce packet active dry yeast
2 teaspoons sugar
1 cup all-purpose flour, plus more for flouring the work surface
1 cup whole-wheat flour
1 teaspoon kosher salt
2 tablespoons olive oil, plus more for coating the bowl
Pizza:
4 slices prosciutto
8 fresh figs, cut in half
3 to 4 ounces blue cheese, crumbled
Directions
For the dough: In a small bowl, combine the yeast with the sugar and 3/4 cup warm water. Let sit for 10 minutes until it begins to foam.
In a large bowl, combine the all-purpose flour, whole-wheat flour and salt and make a well in the center. Add the yeast mixture and the olive oil. Using a fork, incorporate the wet ingredients with the dry ingredients until a dough forms. On a lightly floured surface, continue to work and then knead the dough until it is smooth and elastic, about 8 minutes.
Lightly coat a clean bowl with additional olive oil and add the dough, turning once to coat the dough in oil. Cover and set in a warm place until doubled in size, about 1 hour.
Heat a grill pan over medium-high heat and preheat the oven to 400 degrees F.
Punch down the dough and divide it into 2 pieces, using 1 piece for the pizza. Wrap the remaining dough in plastic wrap and refrigerate or freeze for another pizza.
For the pizza: Stretch the dough into a 12-inch circle that will fit on the grill pan. Add the dough to the hot grill pan and cook until stiff and bubbles start to form, 1 to 2 minutes. Flip and cook on the other side until grill marks form and the dough is completely cooked through, 1 to 2 more minutes.
Transfer the crust to a baking sheet. Lay the prosciutto slices over the crust, then top with the figs and blue cheese. Bake until the cheese melts, about 7 minutes. Serve immediately.
In a food processor, place the cilantro, garlic, lime juice, maple syrup, coriander, and salt and pulse to combine. With the blade running, pour in the olive oil and process until smooth.
Make it creamy (optional) – blend with 1 avocado or ½ cup plain whole milk Greek yogurt
This easy ketchup recipe by Sweet Phi is a lifesaver. Like most people, I probably use ketchup more than any other condiment, but I’m not a huge fan of the extra sugar in the store-bought variety. With this 16-serving recipe, not only do I know there are actual tomatoes in my ketchup, but I also know it’s tasty, healthy and costs less than $1.
2. Whole-Grain Mustard
½ cup yellow mustard seeds
¼ cup brown mustard seeds
½ cup apple cider vinegar
½ cup pale ale beer
1 tablespoon brown sugar
2 tablespoon honey
½ teaspoon salt
As you can probably tell from these ingredients, this whole-grain mustard recipe from Kevin Is Cooking isn’t your standard yellow mustard. This 72-serving recipe is perfect for a fancier dinner party or a regular cookout. Costing about $2 to make, this mustard recipe is hard to beat.
3. Barbecue Sauce
1 ½ cup ketchup
¼ cup mustard
¼ cup brown sugar
Optional: salt
This simple barbecue sauce recipe from Cook the Story, is just the thing to bring a little homemade flare to a backyard barbecue. One batch yields about 14 servings, so this three-ingredient recipe is sure to come in handy. And you can use your own homemade mustard and ketchup!
4. Tartar Sauce
¼ cup mayonnaise
1 teaspoon mustard
1 teaspoon relish
Optional: lemon, garlic powder, onion powder, and salt and pepper to taste
This is my go-to tartar sauce recipe any time fish is on the menu. It’s very rare that I have store-bought tartar sauce in my cupboard, so I just take mayonnaise, mustard (stone ground is my favorite) and relish, and mix them all together in a bowl. At roughly 30 cents for five servings, it’s hard to beat. And if you don’t have an mayonnaise on hand, we’ve got a recipe for that too!
5. Buffalo Sauce
⅓ cup of butter
½ cup hot sauce
1 tablespoon white vinegar
2 teaspoon garlic
Buffalo sauce is something I rarely eat, unless it’s with chicken wings. That said, this recipe from Growing Up Gabel is great for a spontaneous wing night. As with all of these recipes, this three-serving Buffalo sauce recipe is really easy to tweak. If you tend to like more garlic, throw in an extra teaspoon. If you like some kick to your Buffalo sauce, splash in a little extra hot sauce. That way, you’re getting exactly what you want for only $1.30.
6. Mayonnaise
1 raw egg
1 teaspoon apple cider vinegar
⅔ cup vegetable oil
Optional: salt and pepper
You’ll see variants of this mayo recipe everywhere, but I like to keep it simple. Just throw a raw egg, apple cider and vegetable oil in a high-speed blender (I use an immersion blender). If you want some extra flavor, play around with the recipe by adding extra spices, lemon juice or dijon mustard. Not only can you save some fridge space by not buying that giant jar of mayonnaise, but this 14-serving recipe and get exactly the flavor and consistency you want for just about $1.50.
7. Salad Dressing
½ cup balsamic vinegar
1 cup olive oil
3 teaspoon stone-ground mustard
½ teaspoon soy sauce
1 clove garlic
1 teaspoon honey
Optional spices: onion powder, oregano, basil, Italian seasoning, lemon juice, salt and pepper
As fans of the standard oil-and-vinegar salad dressing, this everything-but-the-kitchen-sink recipe has become a tradition in my family. It’s quick and easy, makes no mess and only costs about $2.60 for 26 servings. The base is one part balsamic vinegar and two parts olive oil. From there, feel free to leave out what you don’t want and add in what you do! Throw everything in a mason jar, shake it up and voila! Fresh salad dressing!
8. Marinara Sauce
6-ounce can of tomato paste
¼ cup warm water
⅓ cup olive oil
1 clove of garlic
Optional seasonings: salt, pepper, oregano, basil, thyme, italian seasoning and red pepper flakes
This is another great mason jar recipe my family often uses. It’s great for pizza, pasta, bread — you name it. If you’re feeling creative, this is another recipe you can dress up or down. If you’re looking for something quick, stick to the basic marinara sauce recipe, which only costs $1.12 for a little less than three servings.
If you’re looking for something a little fancier, then play around with spices and fresh herbs or add some novelty ingredients, such as sundried tomatoes or pine nuts. A tip for all of you who dine solo: If you don’t use the whole can of tomato paste, pour the rest in a plastic bag and stick it in the freezer for next time.
9. Hummus
16-ounce can of chickpeas
1 tablespoon lemon juice
1 tablespoon olive oil
1 clove of garlic
1 teaspoon cumin
Optional: salt and pepper
Although not strictly a condiment, this hummus is great on sandwiches, crackers, chips, etc. At $1.86 this recipe feeds six, making it low cost and easy — and I think it’s just a little bit tastier than the store-bought brands. I like to put all the ingredients in a blender for about 3 to 5 minutes, depending on the consistency I want. Throw some extra spices on top, and you don’t even miss the tahini!
10. Tzatziki Sauce
1 cup Greek yogurt
½ cup peeled, seeded and diced cucumber
1 teaspoon dill
1 teaspoon lemon juice
Optional: salt and pepper
I love tzatziki sauce, but it’s not something I come across at the store very often. At about $1.90 for 12 servings, this recipe from Favorite Family Recipes is a great addition, whether it’s on a meat dish or with a side of pita. I like to make this recipe my own by adding a little extra lemon and dill to give it that zing.
Condiments are an easy thing to spend money on because they’re pretty cheap already. But I think we all know that a couple dollars here and there adds up. So, next time you’re in a pinch, try using what you have in your own kitchen — you may discover your new favorite recipe!
If you love to garden and recycle here are some great tips to do both, modernfarmer.com has food substitutes to help your garden get the nutrients it needs from same place as you your kitchen!
Plants thrive on a number of micronutrients, but the three common ingredients found in store bought fertilizer include nitrogen, phosphorus and potassium—otherwise known as NPK. And all of these essential nutrients can likely be found right in your home. If you don’t want to leave your house to purchase plant food, chances are you don’t have to. We’ve put together a list of five foods likely in your kitchen that you can use instead of making a trip to your garden store for fertilizer.
Photography by Glevalex on Shutterstock
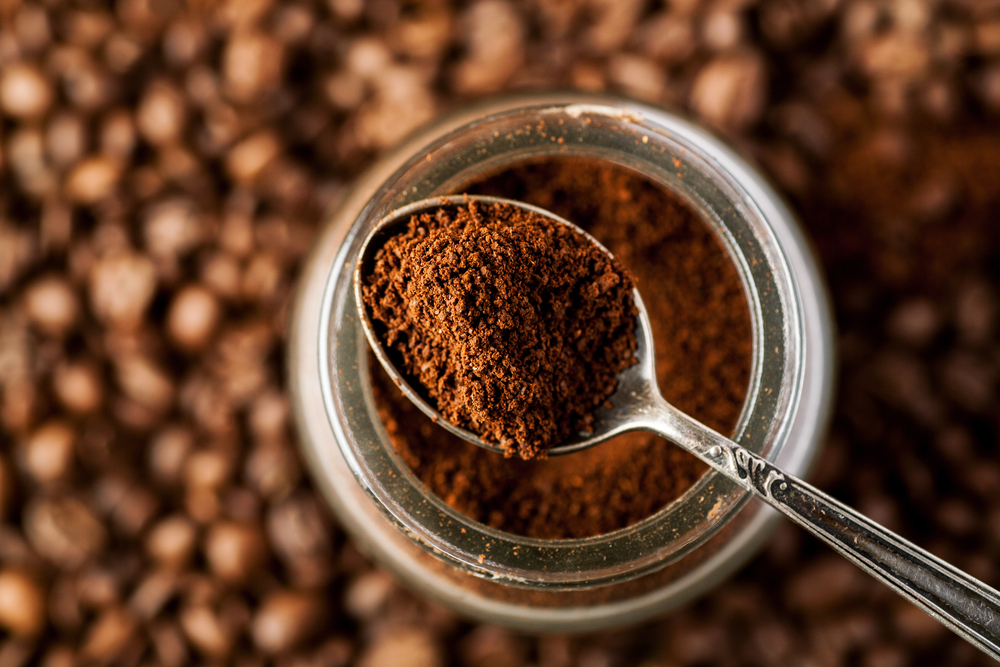
Coffee Grounds
Coffee grounds contain about two percent nitrogen, 0.06 percent phosphorus, and 0.6 percent potassium by volume. They also contain many micronutrients such as calcium, magnesium, boron, copper, iron, and zinc.
You can sprinkle them about in your soil with a quarter-inch layer and work it in with your hands.
As a bonus, many gardeners say that coffee grounds can act as a pest repellent to snails and slugs. However, there is very little research to prove this.
Photo by Avelina on Shutterstock
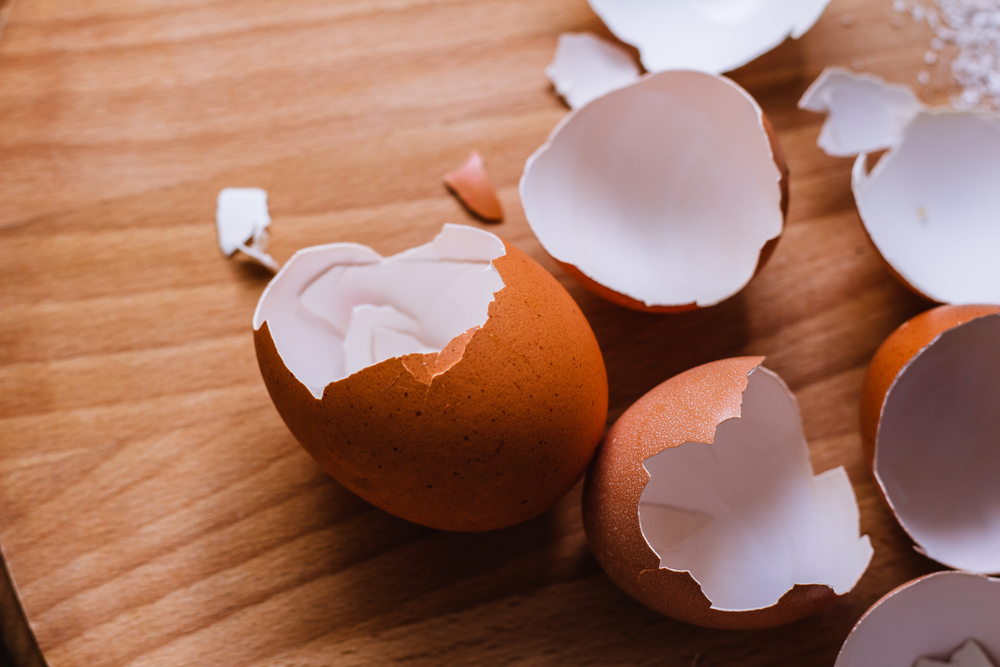
Egg Shells
Eggshells contain calcium, which plays a role in the strength and thickness of plant cell walls. Broken down egg shells on average contain 39.15 percent calcium, 0.4 percent nitrogen and 0.38 percent magnesium.
You can rinse out your eggshells or let them dry in the sun. You can also create a liquid fertilizer using your shells in a mason jar full of water. After four weeks of sitting in the water, it will be ready to start fertilizing with.
Add one cup of this mixture to one gallon of water and water accordingly around your plants.
For a dry fertilizer, take your dry eggshells and blend or crush them up. Blending the eggshells into a powder will speed up the fertilization process. Whether its powder or tiny shells, sprinkle them on the soil around your plants. We recommend you use 4-5 eggs for each plant you want to fertilize. Mix the shells into the soil and add water.
Photo by NaturalBox on Shutterstock.
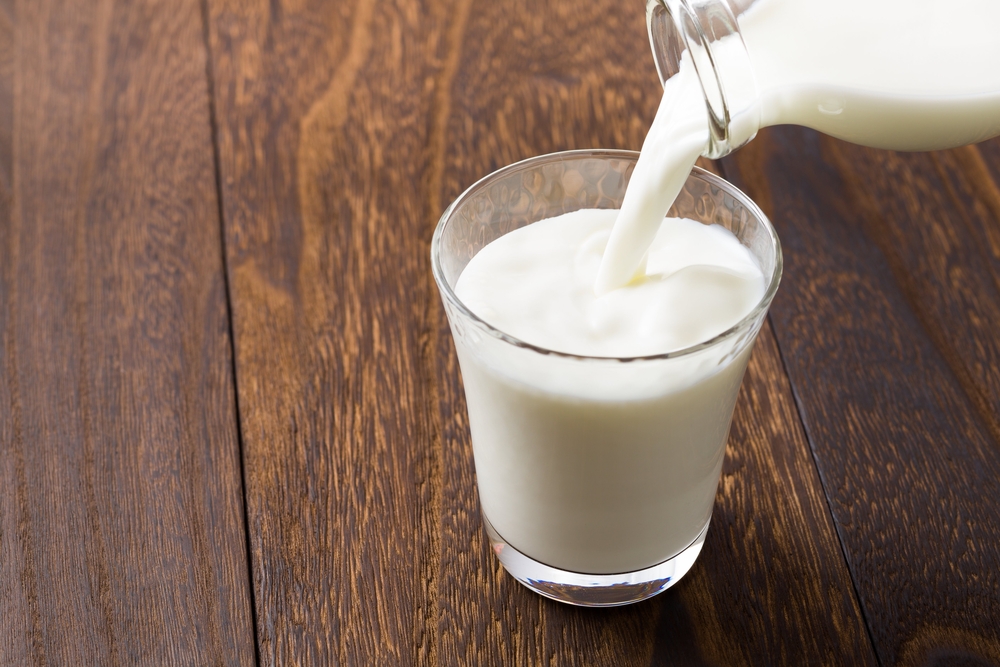
Milk
Milk contains all three common ingredients found in fertilizer. As we all know, it’s also a healthy source of calcium. Researchers have recently suggested that it can be used for a fertilizer substitute on farms.
To use milk as a fertilizer, combine 50 percent milk or powdered milk with 50 percent water. Pour the mixture around the plant’s roots for best results. You can also apply the solution on your plants leaves using a spray bottle.
Photo by nadianb on Shutterstock.
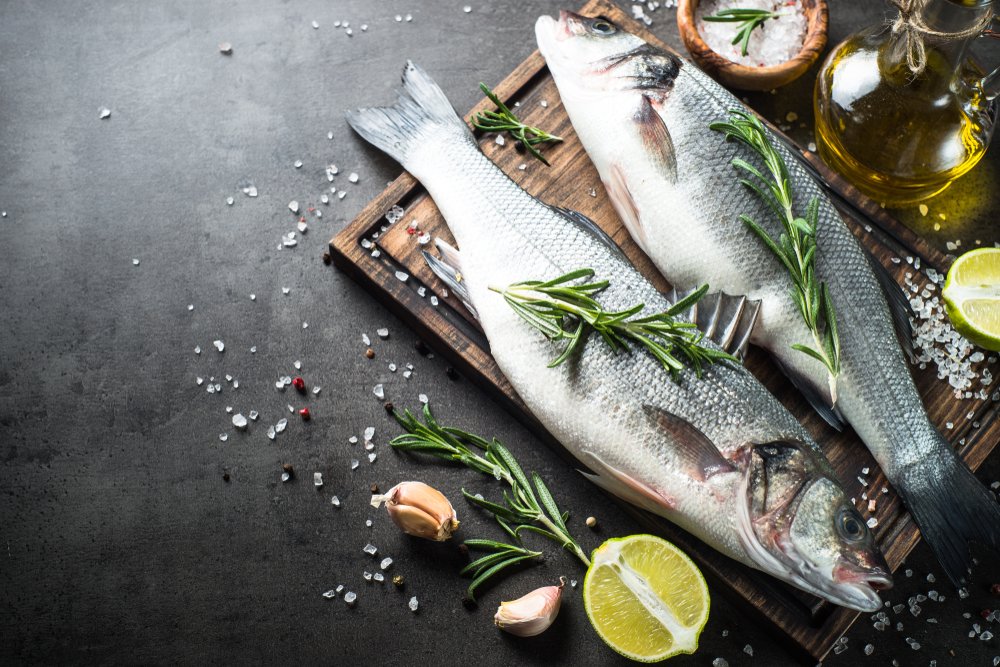
Fish
Using your fish scraps as a fertilizer will help provide all three common nutrients found in fertilizer. Fish are especially good for a nitrogen boost.
You can grind up your fish parts to make your own fertilizer. It’s recommended that you use a hand grinder or a stick blender as opposed to a kitchen blender. Work this into your soil and bury the chunks of fish at the roots of your plants.
Alternatively, you can make a mixture that contains one part fish, three parts sawdust and one bottle of unsulfured molasses. Put your ingredients into a container with a lid for about two weeks until the fish is broken down. Ensure you are stirring the mixture daily.
When you’re ready to use this on your garden, you can use about one tablespoon of your mixture per one gallon of water. You can spray it on your plant’s leaves or at the base of plants.
Photo by Pavlo Lys on Shutterstock.
Banana Peels
Banana peels can hold up to 42 percent potassium and up to 25 percent phosphorous. Other beneficial nutrients in the peel include calcium, magnesium and sulfur.
There are a number of ways that banana peels can be used as fertilizer for your garden. You can soak them inside a mason jar and use the water from the jar as a fertilizer.
If you have them inside the jar, make sure your banana peels are fully immersed or else they will turn moldy. Keep the banana peels in the water for about a week. You can use this mixture with five parts water and water your plants how you would normally.
Alternatively you can dry out the peels for a day in the sun and break them up into tiny pieces. Add them to the soil anywhere from the surface to about four inches down.
We love our doggies so much that when we usually look for a place to live we need to make sure our doggies will like it too. So if there is a yard we start to design it and we need to make sure there is a great space just for them too! Pardee Homes.com has great patio space ideas for your doggies see below:
Create a hydration bar. Just like their humans, dogs need lots of water – about an ounce of fluids per pound of body weight per day. Large breeds can consume several cups of water daily, so having a readily accessible supply of clean water is important. Set up an area, ideally near a water source, for your dog’s hydration bar. Make sure it is in the shade to minimize evaporation.
Step up the shade. After water, shade is the second most important factor for a dog-friendly backyard. Since dogs don’t sweat, they have a harder time cooling down. Watch how sunlight crosses your patio and yard throughout the day. If the area is in full sun, create shady areas for your dog. A covered patio – especially one with ceiling fans to circulate air – makes for an ideal outdoor getaway for dogs and families. You can also create shade by strategically planting native, non-toxic trees and shrubs or investing in umbrellas. For the truly pampered pet, customize an awning-covered dog bed or add a cooling dog mat.
Designate a doggie dig space. For some dogs, there’s nothing better than spending the afternoon digging a new hole. Instead of fighting this natural instinct, direct them to a parent-approved designated dig space. Find a shady corner of the yard for your dog’s personal sandbox, where they can dig for toys and roll in the sand all day long.
Make room for lounging. A comfortable and cool dog bed will have your pup loving the indoor-outdoor lifestyle of your Pardee home. Look for one with a removable waterproof and antibacterial fabric cover for easy washing. What size bed is right? Measure your pup from nose tip to tail, and add about a foot. For the VIP treatment your dog deserves, try an elevated bed that allows for greater airflow on warm days.
Choose dog-friendly plants. Remember that many plants are poisonous for dogs. Among those are aloe, sago palm and many other common landscaping varieties. And, even those that aren’t listed as toxic can still wreak havoc on a dog’s intestinal system. Place potentially harmful potted plants in hanging baskets, plant stands or ledges beyond fido’s reach. And be mindful of plant toxicity when reviewing backyard landscaping options.
Here is another great way to cook pizza grilled! Check out Tiffani Thiessen recipe for both fresh made dough and pizza:
Ingredients
Dough:
One .25-ounce package active dry yeast
2 teaspoons sugar
1 cup all-purpose flour, plus more for flouring the work surface
1 cup whole-wheat flour
1 teaspoon kosher salt
2 tablespoons olive oil, plus more for coating the bowl
Pizza:
1/2 cup ricotta cheese
3 ounces baby arugula
1/2 cup red grapes, sliced in half
2 tablespoons pine nuts
1 lemon, zested
Directions
For the dough: In a small bowl, combine the yeast with the sugar and 3/4 cup warm water. Let sit for 10 minutes until it begins to foam.
In a large bowl, combine the all-purpose flour, whole-wheat flour and salt and make a well in the center. Add the yeast mixture and olive oil. Using a fork, incorporate the wet ingredients with the dry ingredients until a dough forms. On a lightly floured surface, continue to work and then knead the dough until it is smooth and elastic, about 8 minutes.
Lightly coat a clean bowl with additional olive oil and add the dough, turning once to coat the dough in the oil. Cover and set in a warm place until doubled in size, about 1 hour.
Heat a grill pan over medium-high heat and preheat the oven to 400 degrees F.
Punch down the dough and divide it into 2 pieces, using 1 piece for the pizza. Wrap the remaining dough in plastic wrap and refrigerate or freeze for another pizza.
For the pizza: Stretch the dough into a 12-inch circle or oval that will fit on the grill pan. Add the dough to the hot grill pan and cook until stiff and bubbles start to form, 1 to 2 minutes. Flip and cook on the other side until grill marks form and the crust is completely cooked through, 1 to 2 more minutes.
Transfer the crust to a baking sheet and spread with the ricotta. Bake until the ricotta warms through and melts slightly, about 6 minutes. Top the warm pizza with the arugula, grapes, pine nuts and lemon zest. Serve immediately.
Who doesn’t love pizza, pita pizza, french roll pizza, english muffin pizza, flatbread pizza, etc. Well you can use most anything to make pizza but making your own dough is pretty cool too! Check out the video on link to get step by step instructions:
Total: 1 hr 50 min (includes rising time)
Active: 20 min
Yield: dough for 2 pizzas
Ingredients
1 1/3 cups warm water (110 degrees F)
2 1/2 teaspoons sugar
One 1/4-ounce envelope active dry yeast
2 tablespoons extra-virgin olive oil, plus more for brushing
3 teaspoons salt
3 1/2 to 4 cups Italian 00 flour or, if you can¿t get your hands on it, regular all-purpose flour will do
Directions
Add the warm water in a small bowl and sprinkle over 1 teaspoon of the sugar and the yeast; set aside so the yeast can proof.
Oil two bowls with a little olive oil and set aside.
In the bowl of a stand mixer fitted with a dough attachment, mix together the olive oil, salt, 3 1/2 cups of the flour and the remaining 1 1/2 teaspoons sugar. Stir the yeast in the water to make sure it¿s all dissolved and add it to the flour mixture. Mix on medium-low speed until everything is combined. Increase the speed to medium and allow the machine to knead the dough, adding more flour if necessary, until it is smooth and comes away from the side of the bowl, 6 to 7 minutes.
Divide the dough in two pieces and roll each into a ball. Place a ball in each of the oiled bowls seam-side down, and brush the tops with a little oil to stop them from drying out. Cover the bowls with plastic wrap and place in a warm place (inside a microwave or a turned-off oven works best) until it doubles in size and when poked with a finger, the indent remains (it doesn’t spring back), about 1 1/2 hours.
Once the dough has risen, use immediately or store in the refrigerator for up to 24 hours.